Pole barns offer a versatile and cost-effective solution for various needs, from storage to workshops and even living spaces. However, the construction process can often generate significant waste, impacting both your budget and the environment. This guide aims to provide a comprehensive blueprint for building a pole barn while minimizing waste, ensuring a sustainable and cost-efficient project.
1. Planning & Design for Efficiency:
a. Precise Measurements and Design:
Begin by thoroughly planning your pole barn's size, layout, and intended use. Accurate measurements are crucial to avoid over-ordering materials and minimizing waste.
Utilize computer-aided design (CAD) software or hand-drawn plans for detailed visualizations and precise material calculations.
Consider incorporating the "stick-framing method" for walls and roof, which allows for greater flexibility in material usage and avoids potential waste from pre-cut panels.
b. Material Selection and Sourcing:
Lumber: Choose lumber with the least amount of waste potential. Opt for dimensional lumber in standard sizes, minimizing the need for custom cuts. Consider using reclaimed wood where possible, giving it a second life.
Pole Beams: Select pre-cut pole beams to avoid waste during the cutting process. Ensure your supplier provides accurate measurements and guarantees conformity to your specifications.
Metal Roofing & Siding: Consider using pre-fabricated metal roofing and siding panels for a streamlined installation and minimal waste. Choose standard sizes to optimize material usage.
c. Material Order and Delivery:
Order materials with lead times in mind. Stagger deliveries to avoid storing large quantities on-site, which can lead to damage and waste.
Collaborate with your supplier to minimize packaging and ensure efficient delivery to the construction site.
2. Foundation and Framing:
a. Building the Foundation:
Choose foundation types that utilize readily available materials and reduce waste generation. Concrete piers or sonotubes are often preferred over poured concrete slabs, minimizing material waste.
Utilize recycled concrete aggregates or crushed stone for the foundation.
b. Erecting the Pole Beams:
Employ precise leveling and alignment techniques to ensure accuracy and prevent material waste during the framing process.
Use pre-drilled holes for fasteners to avoid unnecessary drilling and wood waste.
Consider using recycled metal brackets and connectors for structural support, promoting a sustainable approach.
3. Wall and Roof Construction:
a. Wall Framing:
Utilize stick-framing for walls, allowing for flexible material usage and minimizing waste from pre-cut panels.
Utilize scrap wood for bracing and support structures within the wall framing, further reducing waste.
Incorporate "waste-conscious" techniques like "scrap wood wall sheathing," where leftover lumber is strategically positioned to maximize its use.
b. Roof Framing:
Opt for pre-engineered truss systems for efficient roof construction and minimal waste generation.
Consider using recycled metal roofing sheets or pre-fabricated metal panels for a durable and sustainable roof.
Employ specialized tools like a "framing square" to ensure accurate cuts and minimize material waste during the roof framing process.
4. Waste Management and Recycling:
a. On-Site Waste Management:
Designate specific areas for waste storage and segregation. Separate waste materials into recyclable, reusable, and non-recyclable categories.
Use large containers for storing waste to prevent debris scattering and enhance cleanup efforts.
Consider using a chipper/shredder to recycle wood waste into mulch or compost.
b. Recycling and Disposal:
Partner with local recycling facilities to properly dispose of recyclable materials, including metal scraps, wood waste, and plastic packaging.
Investigate options for donating usable scrap wood to community workshops or local charities.
Explore the possibility of using a waste removal service that offers responsible disposal and recycling options.
5. Beyond Construction: Maintaining a Sustainable Pole Barn:
a. Energy Efficiency:
Incorporate energy-efficient features like insulation, high-performance windows, and solar panels to reduce your environmental footprint.
Utilize LED lighting for optimal energy efficiency and reduced power consumption.
b. Water Conservation:
Install water-efficient fixtures in your pole barn to minimize water consumption.
Consider using rainwater harvesting systems for irrigation, further reducing your environmental impact.
c. Responsible Material Selection:
Use recycled materials whenever possible for future repairs and upgrades, promoting a circular economy and reducing the demand for virgin resources.
Choose durable and long-lasting materials to minimize the need for frequent replacements and reduce waste generation over time.
Conclusion:
Building a pole barn with minimal waste requires meticulous planning, responsible material selection, and a commitment to sustainability. By implementing the strategies outlined in this guide, you can construct a functional and durable pole barn while minimizing your environmental impact. Remember that responsible construction practices extend beyond the initial build; incorporating energy-efficient features, conserving water, and utilizing recycled materials will ensure a truly sustainable and environmentally conscious pole barn for years to come.
DIY Guide to Building a Pole Barn with Minimal Waste
Pole barns offer a versatile and cost-effective solution for various needs, from storage to workshops and even living spaces. However, the construction process can often generate significant waste, impacting both your budget and the environment. This guide aims to provide a comprehensive blueprint for building a pole barn while minimizing waste, ensuring a sustainable and cost-efficient project.
1. Planning & Design for Efficiency:
a. Precise Measurements and Design:
Begin by thoroughly planning your pole barn's size, layout, and intended use. Accurate measurements are crucial to avoid over-ordering materials and minimizing waste.
Utilize computer-aided design (CAD) software or hand-drawn plans for detailed visualizations and precise material calculations.
Consider incorporating the "stick-framing method" for walls and roof, which allows for greater flexibility in material usage and avoids potential waste from pre-cut panels.
b. Material Selection and Sourcing:
Lumber: Choose lumber with the least amount of waste potential. Opt for dimensional lumber in standard sizes, minimizing the need for custom cuts. Consider using reclaimed wood where possible, giving it a second life.
Pole Beams: Select pre-cut pole beams to avoid waste during the cutting process. Ensure your supplier provides accurate measurements and guarantees conformity to your specifications.
Metal Roofing & Siding: Consider using pre-fabricated metal roofing and siding panels for a streamlined installation and minimal waste. Choose standard sizes to optimize material usage.
c. Material Order and Delivery:
Order materials with lead times in mind. Stagger deliveries to avoid storing large quantities on-site, which can lead to damage and waste.
Collaborate with your supplier to minimize packaging and ensure efficient delivery to the construction site.
2. Foundation and Framing:
a. Building the Foundation:
Choose foundation types that utilize readily available materials and reduce waste generation. Concrete piers or sonotubes are often preferred over poured concrete slabs, minimizing material waste.
Utilize recycled concrete aggregates or crushed stone for the foundation.
b. Erecting the Pole Beams:
Employ precise leveling and alignment techniques to ensure accuracy and prevent material waste during the framing process.
Use pre-drilled holes for fasteners to avoid unnecessary drilling and wood waste.
Consider using recycled metal brackets and connectors for structural support, promoting a sustainable approach.
3. Wall and Roof Construction:
a. Wall Framing:
Utilize stick-framing for walls, allowing for flexible material usage and minimizing waste from pre-cut panels.
Utilize scrap wood for bracing and support structures within the wall framing, further reducing waste.
Incorporate "waste-conscious" techniques like "scrap wood wall sheathing," where leftover lumber is strategically positioned to maximize its use.
b. Roof Framing:
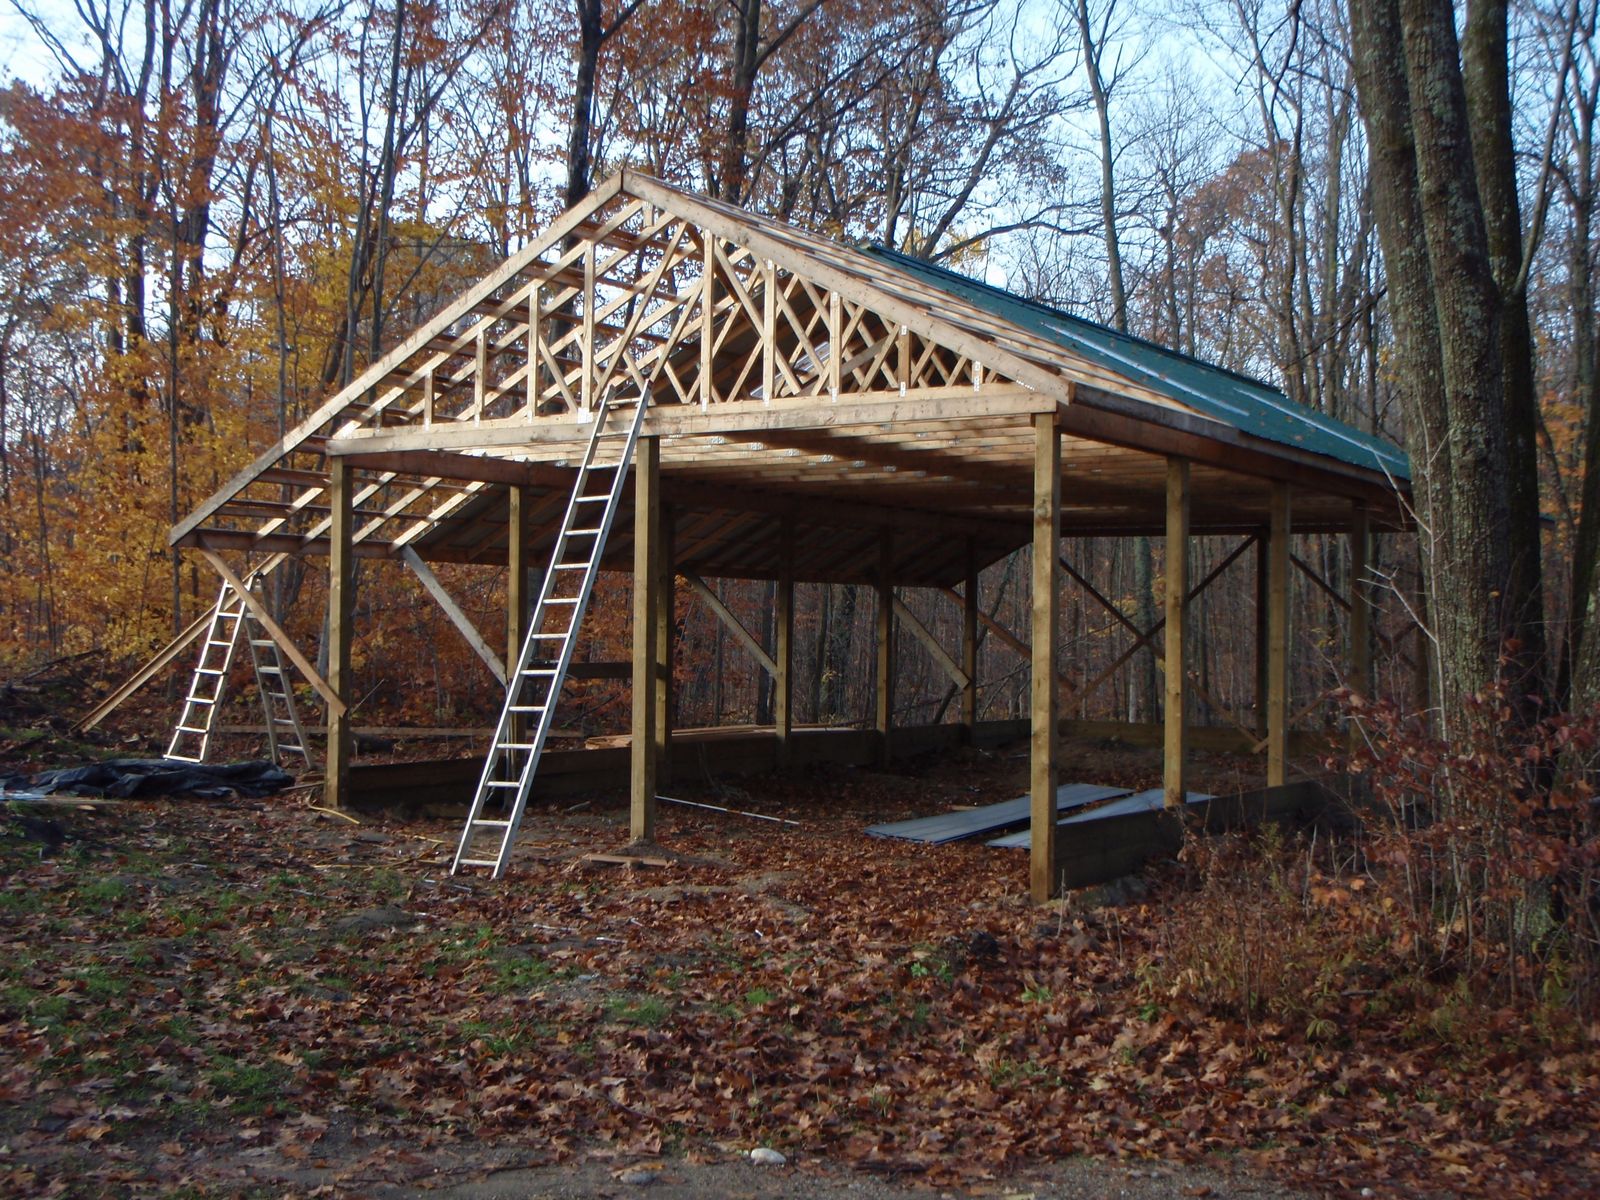
Opt for pre-engineered truss systems for efficient roof construction and minimal waste generation.
Consider using recycled metal roofing sheets or pre-fabricated metal panels for a durable and sustainable roof.
Employ specialized tools like a "framing square" to ensure accurate cuts and minimize material waste during the roof framing process.
4. Waste Management and Recycling:
a. On-Site Waste Management:
Designate specific areas for waste storage and segregation. Separate waste materials into recyclable, reusable, and non-recyclable categories.
Use large containers for storing waste to prevent debris scattering and enhance cleanup efforts.
Consider using a chipper/shredder to recycle wood waste into mulch or compost.
b. Recycling and Disposal:
Partner with local recycling facilities to properly dispose of recyclable materials, including metal scraps, wood waste, and plastic packaging.
Investigate options for donating usable scrap wood to community workshops or local charities.
Explore the possibility of using a waste removal service that offers responsible disposal and recycling options.
5. Beyond Construction: Maintaining a Sustainable Pole Barn:
a. Energy Efficiency:
Incorporate energy-efficient features like insulation, high-performance windows, and solar panels to reduce your environmental footprint.
Utilize LED lighting for optimal energy efficiency and reduced power consumption.
b. Water Conservation:
Install water-efficient fixtures in your pole barn to minimize water consumption.
Consider using rainwater harvesting systems for irrigation, further reducing your environmental impact.
c. Responsible Material Selection:
Use recycled materials whenever possible for future repairs and upgrades, promoting a circular economy and reducing the demand for virgin resources.
Choose durable and long-lasting materials to minimize the need for frequent replacements and reduce waste generation over time.
Conclusion:
Building a pole barn with minimal waste requires meticulous planning, responsible material selection, and a commitment to sustainability. By implementing the strategies outlined in this guide, you can construct a functional and durable pole barn while minimizing your environmental impact. Remember that responsible construction practices extend beyond the initial build; incorporating energy-efficient features, conserving water, and utilizing recycled materials will ensure a truly sustainable and environmentally conscious pole barn for years to come.
How to Make a Pole Barn for Heavy Equipment Storage

A pole barn, also known as a post-frame building, is a versatile and cost-effective structure suitable for various purposes, particularly heavy equipment storage. Its straightforward design, utilizing strong posts directly embedded in the ground to support the roof and walls, offers a robust and efficient solution for housing large, cumbersome machinery. This guide provides a comprehensive overview of the process involved in constructing a pole barn specifically for heavy equipment storage.
1. Planning and Design Considerations:
a. Determine Storage Needs:
Equipment Dimensions: Thoroughly measure the dimensions of the largest equipment pieces, including height, length, and width. Account for clearance for doors, maneuvering space, and any future additions.
Equipment Weight: Consider the weight of the heaviest equipment to ensure the foundation and structure can withstand the load.
Maintenance and Repair: Allow sufficient space for maintenance and repair, including access points for tools, parts, and machinery servicing.
b. Site Selection and Preparation:
Access: Choose a site with easy access for large trucks and equipment, with adequate road width and turning radius.
Drainage: Ensure proper drainage to prevent water accumulation and potential foundation issues.
Utilities: Consider the availability of electricity, water, and sewage if required for lighting, heating, or equipment operation.
Zoning and Building Codes: Verify local zoning regulations and building codes concerning structure size, setbacks, and permits.
c. Building Design:
Size and Shape: Opt for a rectangular shape to maximize usable floor space.
Roof Pitch: Choose a steeper pitch (8/12 or higher) for snow load and better ventilation.
Doors: Select large, durable doors that accommodate the largest equipment, with features like automatic openers for ease of access.
Ventilation: Adequate ventilation is crucial to prevent condensation and ensure air circulation.
2. Foundation Construction:
a. Site Preparation:
Clear the building site of debris, trees, and vegetation.
Level the ground and compact the soil for a stable foundation.
b. Post Installation:
Post Type: Choose pressure-treated lumber, steel, or concrete posts with sufficient strength and durability.
Spacing: Spacing between posts will depend on the roof design and the weight of the stored equipment.
Depth: Posts should be buried deep enough to ensure stability, typically 4-6 feet, depending on local soil conditions.
Concrete Anchoring: For optimal stability, use concrete to anchor the posts.
c. Foundation Footing:
Footings: Use concrete footings to distribute the load of the posts evenly.
Size: The size of the footings will depend on the weight of the posts and the soil bearing capacity.
Reinforcement: Add rebar to the footings for added strength.
3. Frame Construction:
a. Wall Framing:
Studs: Use pressure-treated lumber for wall studs.
Spacing: Typical stud spacing is 16 inches on center.
Sheathing: Install plywood or OSB sheathing for added strength and structural integrity.
Insulation: Consider insulation for temperature control and energy efficiency.
b. Roof Framing:
Rafters: Choose strong, durable rafters to support the roof load.
Spacing: Rafter spacing will depend on the roof design and the weight of the roof covering.
Sheathing: Use plywood or OSB sheathing to create a solid roof surface.
c. Roof Covering:
Material: Opt for durable and weather-resistant roofing material, such as metal roofing or shingles.
Installation: Properly install the roofing material according to manufacturer instructions.
4. Wall and Roof Finishing:
a. Siding:
Material: Choose durable and low-maintenance siding material, such as metal, vinyl, or fiber cement.
Installation: Install siding according to manufacturer instructions.
b. Roof Finishing:
Gutter and Downspouts: Install gutters and downspouts to manage rainwater and prevent water damage.
Flashing: Use flashing around roof penetrations (like vents and chimneys) to prevent leaks.
5. Door Installation:
a. Door Type:
Overhead Doors: Consider overhead doors for ease of access and maximum opening space.
Sliding Doors: Sliding doors are a good option for limited space.
Materials: Choose durable materials, such as steel or aluminum, for long-lasting performance.
b. Installation:
Frame: Install a sturdy frame to support the door.
Hardware: Use quality hardware and tracks for reliable operation.
Automation: Consider automatic door openers for convenience and safety.
6. Interior Finishing:
a. Flooring:
Concrete: Concrete floors are durable and easy to clean.
Gravel: Gravel floors are cost-effective and suitable for light-duty storage.
Epoxy Coatings: Apply epoxy coatings to concrete floors for added durability and aesthetics.
b. Lighting:
Adequate Illumination: Install sufficient lighting for safe and efficient equipment operation.
Safety: Use appropriate lighting fixtures for a safe working environment.
c. Storage Solutions:
Shelving: Consider shelving units for smaller equipment or parts storage.
Pegboards: Utilize pegboards for hanging tools and accessories.
7. Safety and Maintenance:
a. Fire Safety:
Fire Extinguishers: Install appropriate fire extinguishers and maintain them regularly.
Smoke Detectors: Install smoke detectors to provide early warning in case of fire.
Fire Suppression Systems: Consider installing a fire suppression system for additional safety.
b. Electrical Safety:
Wiring: Install proper electrical wiring and outlets to power equipment and lighting.
GFCIs: Install Ground Fault Circuit Interrupters (GFCIs) in areas where water is present.
c. Regular Maintenance:
Inspection: Regularly inspect the structure for any signs of damage or deterioration.
Roof Maintenance: Clean gutters and downspouts and inspect the roof for leaks.
Foundation Maintenance: Check the foundation for any signs of movement or settling.
8. Cost Considerations:
Materials: The cost of materials will vary depending on the size of the structure, the type of materials used, and the local market prices.
Labor: The cost of labor will depend on the complexity of the project and the labor rates in your area.
Permits and Inspections: Factor in the cost of permits and inspections.
Contingency: Always include a contingency fund for unexpected costs.
Conclusion:
Building a pole barn for heavy equipment storage offers a practical and economical solution for managing your machinery and maximizing efficiency. By carefully planning, selecting appropriate materials, and following the guidelines outlined in this guide, you can ensure a durable and functional structure that will serve you well for years to come. Remember to prioritize safety throughout the construction process and to maintain the building regularly to ensure long-term performance.
How to Make a Pole Barn with Strong and Reliable Supports

Alright, you've decided to build a pole barn. Good for you! It's a fantastic way to add space and functionality to your property. Whether you're dreaming of a workshop, a storage space, or even a cozy living area, a pole barn offers endless possibilities. But before you start digging holes and hoisting lumber, let's talk about the heart and soul of your pole barn: the supports.
Building a Strong Foundation: The Pillars of Your Pole Barn
Think of those support poles as the backbone of your structure. They're taking all the weight, the wind, the snow, and everything else life throws at your barn. So, we need to make sure they're up to the task.
1. Choosing the Right Material: It's About More Than Just Wood
While wood is a classic choice for pole barn supports, it's not the only option. You've got a whole buffet of materials to choose from, each with its own strengths and weaknesses:
Pressure-Treated Wood: This is a popular option for pole barns because it's naturally resistant to rot, decay, and insects. It's also relatively inexpensive. Just remember, pressure-treated lumber can be harder to work with than regular wood, and it might require special fasteners.
Steel: Steel poles are incredibly strong, durable, and long-lasting. They can withstand heavy loads and harsh weather conditions. However, they can be expensive and may require special tools and expertise for installation.
Concrete: Concrete poles are strong and resistant to moisture, fire, and insects. They're a great option for areas with high humidity or where you want maximum fire resistance. But they can be heavy, require skilled labor for installation, and might not be as aesthetically pleasing as wood or steel.
2. Size Matters: Picking the Right Poles for the Job
Don't just grab the first poles you see! The size and diameter of your support poles are crucial to the strength and stability of your barn. Here's what you need to consider:
The Span: How far apart will your support poles be? Larger spans require larger and stronger poles.
The Roof Load: The weight of your roof will determine the strength of the poles you need. Consider the snow load in your area, the roofing material, and any potential additions you plan on adding in the future.
Local Building Codes: Make sure you're aware of the building codes in your area, which will specify the minimum pole size and spacing.
3. Setting the Stage: Proper Pole Installation is Key
Now that you've chosen your materials and determined the right pole size, it's time to install those bad boys! Here's a breakdown of the process:
Digging the Holes: The holes for your support poles need to be deep enough to provide stability and support for the structure. The depth will vary based on soil conditions, wind loads, and local building codes.
Concrete Foundations: Once your holes are dug, it's time to pour concrete. This forms the foundation for your poles and ensures they're firmly anchored. Make sure to use proper formwork to create a level and solid base.
Setting the Poles: Carefully lower the poles into the concrete and make sure they're plumb and level. You'll need a level and plumb line to ensure everything is perfect.
Securing the Poles: Use proper fasteners and concrete anchors to secure the poles to the concrete. This ensures that your poles won't move or shift over time.
4. Strengthening the Structure: Adding Bracing for Extra Support
Just like you need support in your life, your pole barn needs some extra reinforcement to withstand the elements. Bracing is your key to a stronger, more stable structure.
Horizontal Bracing: This type of bracing is installed between the poles to prevent them from swaying or buckling under pressure. It can be made from wood or steel and should be placed strategically for maximum strength.
Diagonal Bracing: This bracing is often used for walls and roofs. It creates a triangular structure that adds rigidity and prevents the poles from moving.
Gable Bracing: For roofs, gable bracing is crucial for preventing racking and maintaining structural integrity.
5. Extra Protection: Beyond the Basics
Don't stop at the basic support. Consider these extra steps to ensure your pole barn is built to last:
Rot and Termite Protection: For wooden poles, use a sealant or treatment to protect them from moisture and insects.
Corrosion Protection: For steel poles, a rust-resistant coating is essential. Consider using galvanized steel or applying a protective paint or sealant.
Seismic Protection: If you live in an earthquake-prone area, consider adding seismic bracing or reinforcement to your pole barn structure.
Building with Confidence: Your Journey to a Pole Barn Paradise
Building a pole barn might seem daunting, but with careful planning and attention to detail, you can create a strong, sturdy structure that will stand the test of time. Remember: the strength of your pole barn starts with the quality and installation of its support poles.
So, go ahead, embrace the challenge, and build your dream pole barn. It's a project that will bring you immense satisfaction and a place you'll love for years to come.
How to Build a Pole Barn with a Simple Gable Roof

Alright, friend, let's talk about building a pole barn. You know, that sturdy, simple structure that can be a workshop, a garage, a storage shed, or even a cozy little hangout spot. We're gonna focus on the basic design with a gable roof, because that's the classic, straightforward style that gets the job done.
First things first, let's talk about your plan. You need to figure out what you want to build. How big? What will you store in it? How much weight will it need to handle? And don't forget about local building codes! Check with your town or county for the rules and regulations.
Now, let's get those poles in the ground. These are the backbone of your pole barn, so choose strong, durable materials. You can use pressure-treated lumber, steel, or even concrete poles. The size and spacing depend on the size and weight you'll be handling. Remember, you'll need to dig holes for these poles, and they should go deep enough to be stable. You can use a post hole digger, a power auger, or even hire a professional to do the digging.
Next up, let's talk about that frame. This is where your roof and walls will connect. The frame is usually made of lumber, and it's important to choose the right size and grade for the job. For the gable roof, you'll need to create a triangular truss system, which is essentially a frame made of wood that supports the roof's weight. These trusses can be pre-fabricated or built on site.
Now for the roof. You'll need plywood or OSB sheathing to cover the trusses, and then you can choose your roofing material. Think asphalt shingles, metal roofing, or even rubber roofing.
Speaking of walls, let's get them up. You can use pre-made wall panels or frame them yourself using lumber. Don't forget about windows and doors! Choose the right size and location for your needs.
Once the walls and roof are up, it's time for the finishing touches. Think insulation, siding, and even interior finishes. There's so much you can do to personalize your pole barn! You can add things like a concrete floor, a wood floor, or even a loft for extra storage or living space.
But before you get too excited, let's talk about safety. Building a pole barn can be physically demanding, and there's always a chance of injury. So, be sure to wear safety glasses, gloves, and appropriate footwear. And never work alone, especially if you're dealing with heavy materials.
And remember, this is just a basic overview. Building a pole barn involves a lot of steps, and it can be a complex process. But don't be intimidated! There are tons of resources available to help you along the way. You can find books, websites, and even YouTube videos that provide step-by-step instructions.
And lastly, don't forget to have fun! Building your own pole barn can be a rewarding experience, and it's a great way to create a space that's truly your own. So get out there, grab your tools, and start building!
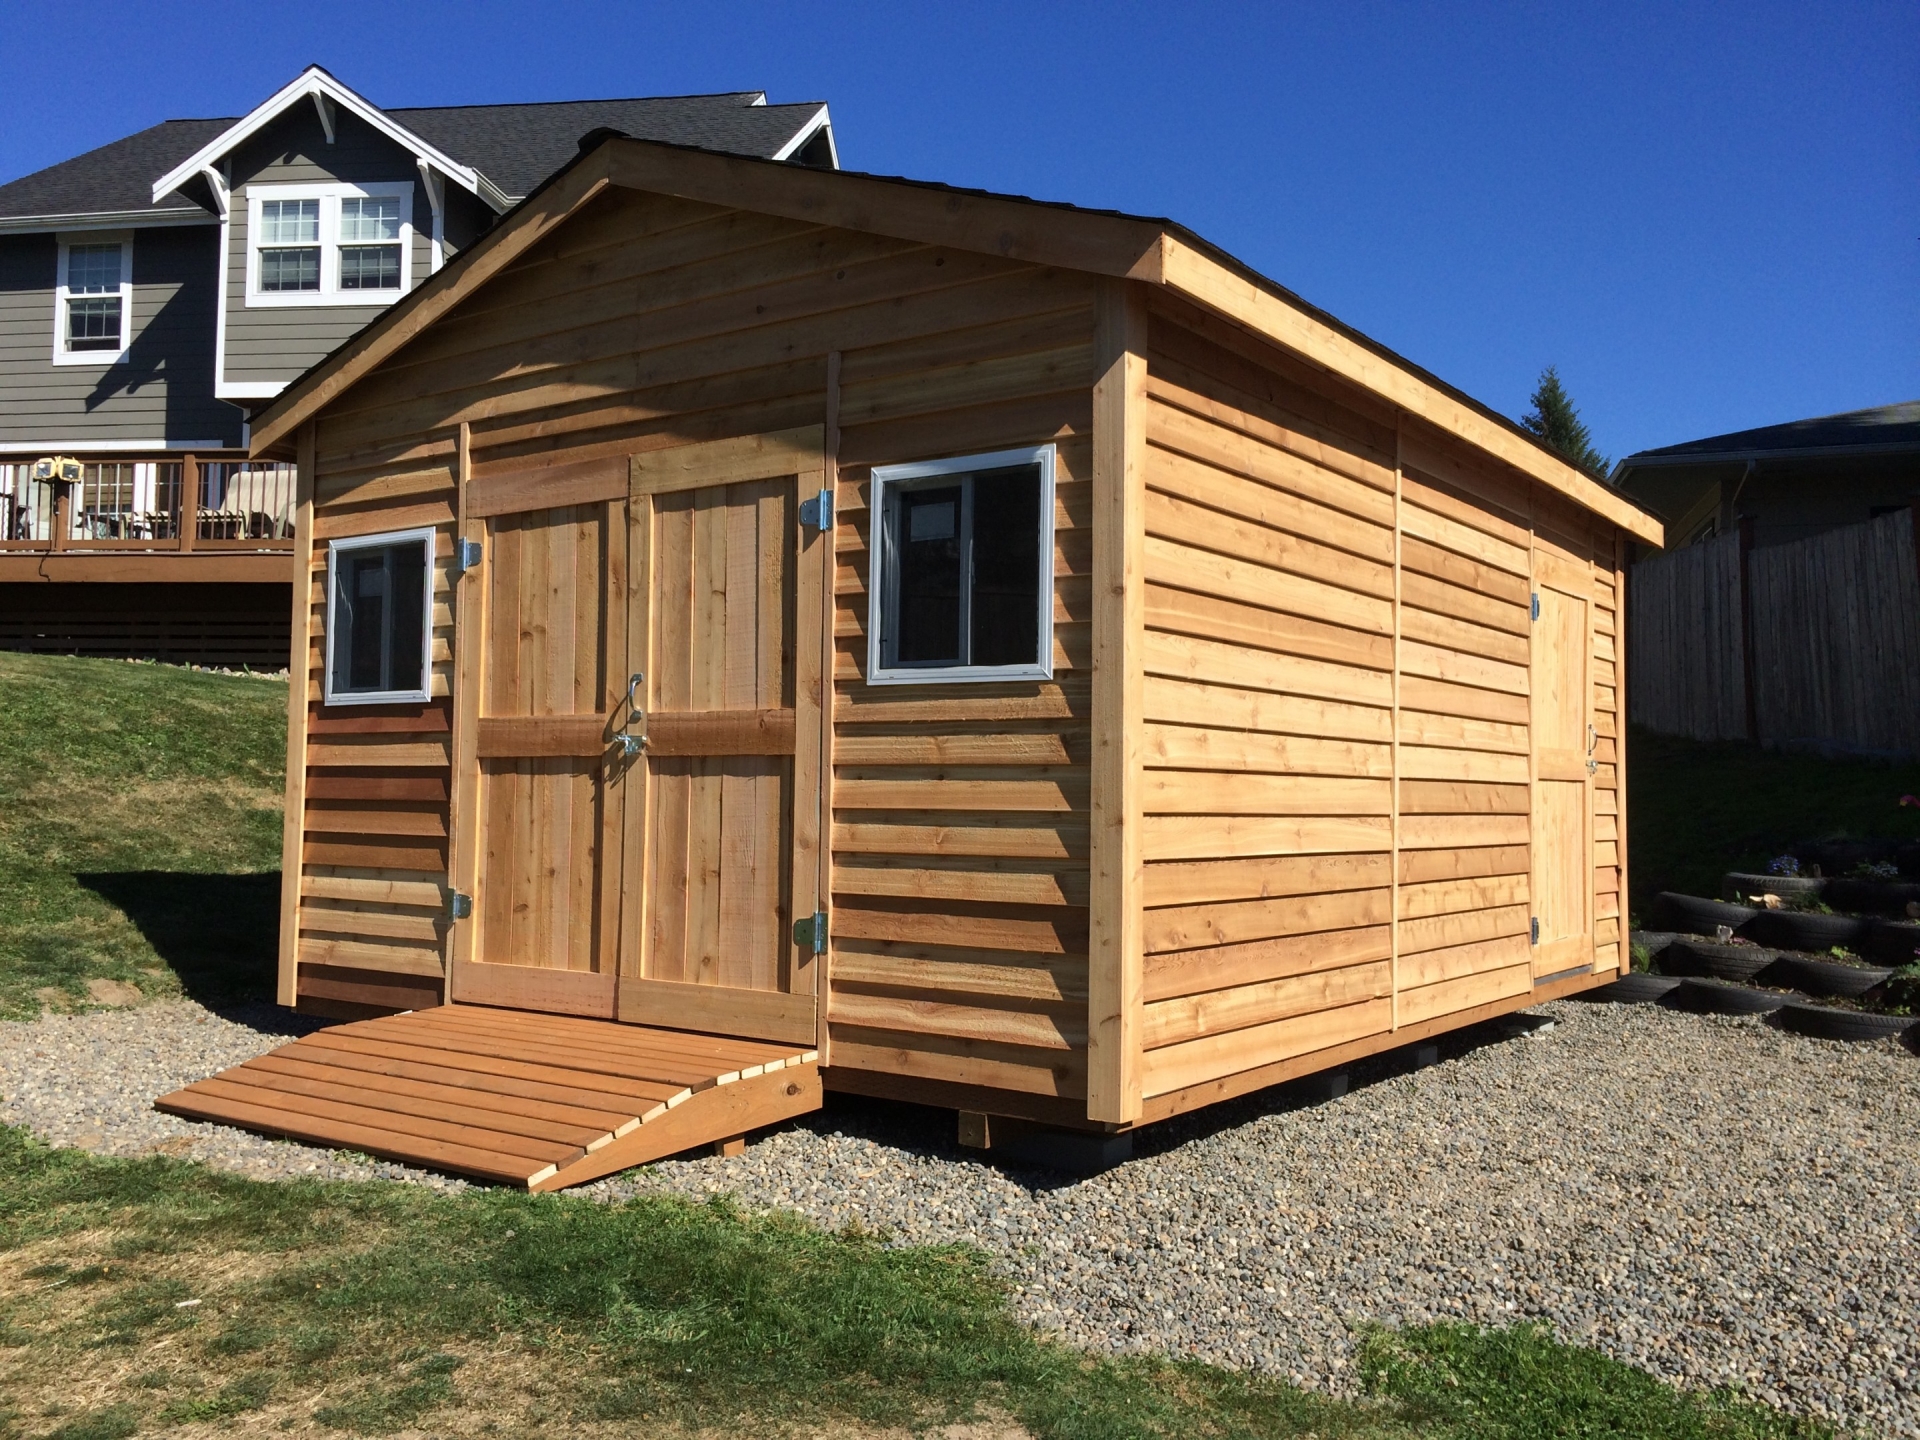
How to build a 12x16 garden shed to fit your backyard

Okay, so you've got this vision, right? A neat and tidy backyard, free from clutter, and a place to store all your gardening tools, lawnmower, and maybe even a comfy chair for those quiet moments amidst the blooms. A garden shed - it's the perfect solution!
But here's the thing: building a shed isn't just about hammering a few boards together. It's about careful planning, attention to detail, and a touch of DIY pride. That's where I come in - your trusty guide to tackling this awesome project.
First Things First: The Planning Stage
Before you even pick up a hammer, you need a solid plan. Think about your backyard, the space you have, and the things you want to store in your shed.
Location, Location, Location: Choose a spot that's level and well-drained. Avoid areas prone to flooding or close to trees that might drop branches. Remember, you'll need enough space to access the shed from all sides, especially if you're planning on using a truck to transport materials.
Check Local Codes: Every town has building codes, so make sure you understand the requirements for shed construction in your area. Don't want to be caught with an illegal shed, right?
Design and Size: Are you planning a simple storage shed or something fancier with windows and doors? This will determine the materials and complexity of the project.
Foundation: You can go for a simple concrete slab, gravel pad, or even just a wooden frame set on concrete blocks. Decide what works best for your soil type and budget.
Materials: Think about the look you're going for. Do you want a rustic wooden shed, or something more modern with metal siding? Decide on your budget and the materials that best fit your style.
Let's Get Building!
Once you have your plan, it's time to gather your tools and materials. Don't forget to wear your safety gear, and always follow the manufacturer's instructions for any power tools.
Here's a general breakdown of the steps:
1. Building the Foundation
Concrete Slab: If you're going with a concrete slab, hire a concrete contractor or mix your own. Ensure the slab is level and has a slight slope for drainage.
Gravel Pad: Lay a bed of gravel and compact it for a sturdy foundation.
Wooden Frame: Build a frame of pressure-treated lumber, anchored with concrete blocks or posts for added support.
2. Framing the Walls and Roof
Wall Framing: Use pressure-treated lumber for the base plate and top plate, and then build a series of studs to create the walls.
Roof Framing: This is where your design comes in. You can go for a gable roof, a shed roof, or even a hip roof. The framing for each is slightly different. Check online tutorials for step-by-step instructions.
Sheathing: This is a layer of plywood or OSB (oriented strand board) that provides stability and strength. Attach it to the framing with screws or nails.
3. Roofing and Siding
Roofing: Choose a roof material that suits your needs and budget. Asphalt shingles are a common and affordable option, while metal roofing offers durability and a sleek look. Install the roofing according to the manufacturer's instructions.
Siding: Again, you have options: wood siding, vinyl siding, metal siding, or even cedar shingles. Decide what fits your design and budget. Attach the siding to the sheathing with screws or nails.
4. Doors and Windows
Door: Choose a door that's wide enough to accommodate your needs. Consider the style - single door, double door, sliding door?
Windows: Adding windows can provide natural light and ventilation. Decide on the size and number of windows you want.
5. Finishing Touches
Interior Walls and Floors: You can choose to paint or stain the interior walls and add a floor covering like plywood or concrete.
Insulation: If you plan on using the shed year-round, consider adding insulation to keep it warm in winter and cool in summer.
Electrical: For lights or power outlets, you'll need to run electrical wiring and have it inspected by a qualified electrician.
Safety First, Always!
Wear Safety Gear: Don't forget your safety glasses, work gloves, and hearing protection.
Proper Lifting Techniques: Be careful when lifting heavy objects. Always lift with your legs, not your back.
Power Tool Safety: Follow the manufacturer's instructions for all power tools.
Fire Safety: Keep a fire extinguisher handy in case of a fire.
The Joy of Building
Building a shed is hard work, but it's incredibly rewarding. You'll learn new skills, challenge yourself, and create a beautiful addition to your backyard. You'll get a sense of accomplishment, and you'll have a space that's perfectly suited to your needs.
Remember, it's all about the journey!
Don't be afraid to ask for help if you need it. There are tons of online resources, YouTube videos, and even local workshops that can guide you through the process. And most importantly, enjoy the experience!
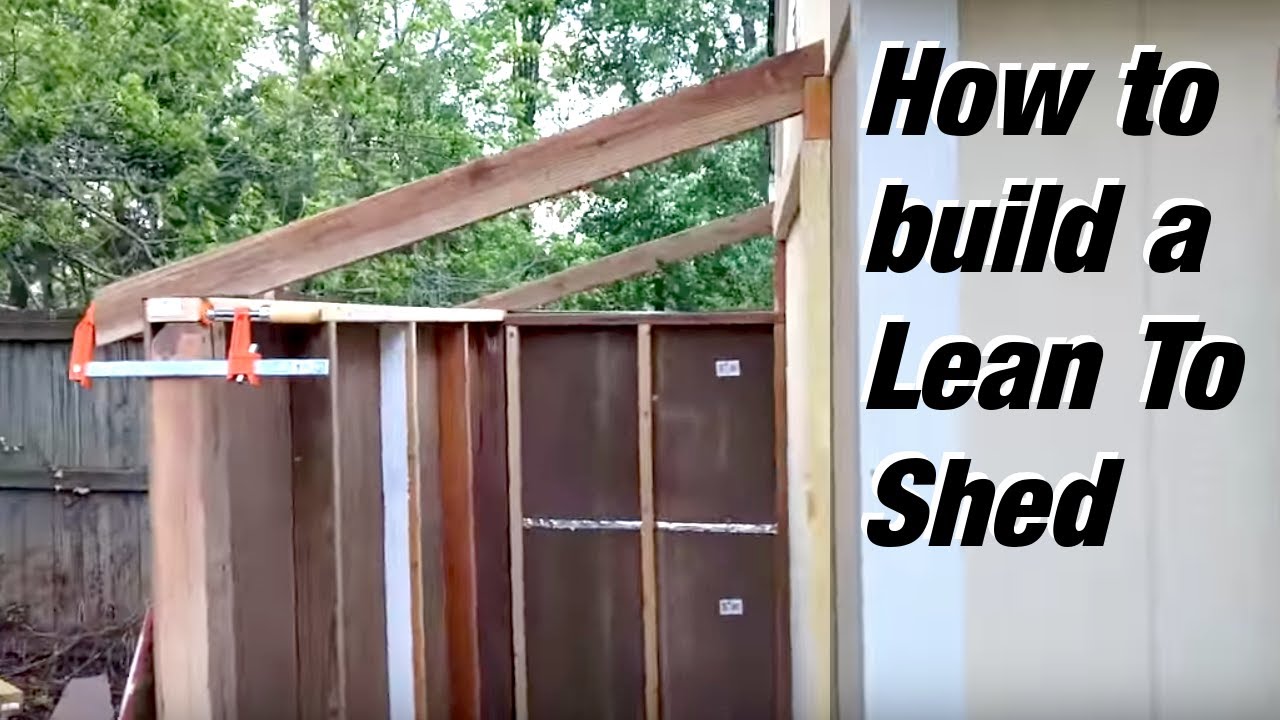
How to build a lean-to shed for limited yard space

Okay, let's be real. Yard space is a luxury, not a given. You've got that tiny patch of green, maybe enough for a couple of chairs and a grill, and you're dreaming of a shed. But you're thinking, "There's no way! It'll swallow up my whole yard!" Hold on, friend, because a lean-to shed might just be your answer.
What's a lean-to shed, anyway?
Imagine a triangle, kinda like the roof of a house, but propped up against your existing fence, garage, or even a sturdy tree. That's a lean-to! It's a simple, economical way to add storage without taking up much space.
The Lean-to's Big Advantages:
Space-Saving: It's all about the angle! The lean-to shape means it doesn't need much ground space. You can squeeze it into that corner, right next to the fence.
Affordable: They're generally less expensive to build than a standalone shed, which can be a huge bonus for your budget.
Easy to Build: You don't need to be a construction pro to handle this project. It's a great DIY challenge.
Versatile: You can personalize it! Turn it into a workshop, a potting shed, or even a mini greenhouse.
Let's Get Building!
Ready to tackle this project? Here's a step-by-step guide to building your lean-to shed:
1. Planning is Key:
Decide on your lean-to's size: Measure your space carefully. You want a size that fits comfortably without feeling cramped.
Choose the right location: Make sure it's level, has good drainage, and is close to a power source if you need it.
Pick your materials: Think about the style you want â" wood, metal, or a combination. Consider the weather in your area.
2. Getting Down to Business:
Building the Base: Start with the foundation. A concrete slab is ideal, but you can get away with a well-prepared gravel base or even pressure-treated lumber.
Frame It Up: This is where the magic happens. You'll need to build a sturdy frame using 2x4s or 2x6s. Make sure the framing is square and level.
Roofing Time: Choose your roofing material. Shingles, metal, or even corrugated plastic are good options. Attach the roofing to the frame, making sure it overlaps for watertight protection.
Adding the Walls: This is your chance to personalize! You can use plywood, tongue-and-groove boards, or even recycled materials. Remember to leave some room for doors and windows.
3. Finishing Touches:
Doors and Windows: Decide what you need for access and light. You can create a single door, sliding doors, or even a window for ventilation.
Insulation and Finishing: If you want to use your lean-to in different seasons, think about adding insulation. Then, choose your siding, paint, and other finishing touches to match your existing structures.
Flooring: You'll need a floor. Use concrete, wood, or even vinyl tiles. Choose something that's durable and matches the overall style.
Let's Address Those Concerns:
âWhat if my yard is really small?â
Don't worry! You can make your lean-to even more compact. Try a single-slope roof instead of a traditional gable roof. This saves even more space and still provides excellent protection.
"Won't it be too dark inside?"
Not if you plan for natural light! Add a skylight or a window on the side. This also helps with ventilation.
"What about permits?â
Check with your local building department. Often, small lean-to sheds don't require permits, but it's better to be safe than sorry.
Building Your Own Lean-to: An Adventure in Storage
Remember, building a lean-to is about more than just storage. It's about creativity, problem-solving, and taking on a satisfying DIY project. With a little planning and effort, you can transform your tiny yard into a functional, charming, and personalized space for years to come. And hey, who knows, maybe you'll be inspired to build another one! You might even get hooked on this whole shed-building thing. Just sayin' ð